
A 4-Week Adobe Photoshop Certification Study Plan You Can Follow
A structured, day-by-day roadmap that turns Adobe's exam objectives into manageable study sessions and practice checkpoints.
You know Photoshop well enough to get through client work, but that confidence starts to crack when you sit down with the official exam guide and realize how many features you've never touched. The Visual Design Using Adobe Photoshop exam (also listed as Adobe Certified Professional) covers interface fundamentals, document organization, asset creation, output workflows, and design correction — domains that span far deeper than everyday editing. Adobe's own guidance notes that certification typically requires around 150 hours of hands-on experience and instruction, which feels daunting if you're squeezing study sessions between a full-time job and life.
This adobe photoshop certification study plan compresses that preparation into four focused weeks. Each week groups related exam domains, assigns daily tasks you can finish in 60 to 90 minutes, and ends with a PlanetCert practice-test checkpoint that exposes gaps before they follow you into the testing center. Whether you're a freelance designer chasing a credential or an IT pro pivoting into creative roles, the checklist below keeps you honest about what you've covered and what still needs work.
Before You Start: What to Set Up
Rushing into Week 1 without the right environment wastes time. Spend 30 minutes on the items below so every study session starts clean.
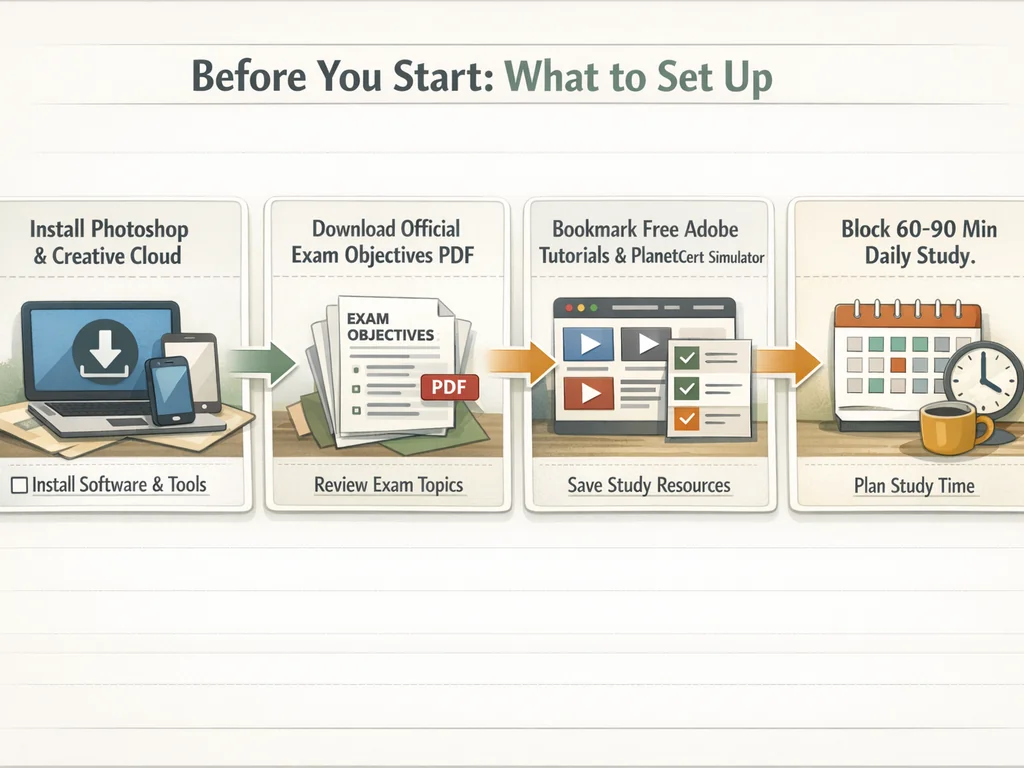
- ☐ Install the latest Adobe Photoshop version. The exam tests live-in-the-app tasks, so your interface must match what the testing center runs. Check the current version on the Adobe Certification Exams page.
- ☐ Download the official exam guide PDF. Adobe publishes objective-by-objective breakdowns. Print it or keep it open as a side-by-side reference during every session.
- ☐ Create a dedicated practice folder. Build a folder structure —
Week1-Interface,Week2-Assets, and so on — so you can revisit project files without hunting through Downloads. - ☐ Set up a PlanetCert account. Grab practice questions aligned to the exam objectives early. Trying sample items before you study gives you a baseline score to measure against at each checkpoint.
- ☐ Block 60 to 90 minutes per day on your calendar. Treat study sessions like client meetings. Consistency matters more than marathon weekend sessions.
- ☐ Gather stock assets for practice. Download 10 to 15 sample images (raw, JPEG, and PNG) plus a few vector files. You'll need these for hands-on exercises across all four domains.
When Priya, a UI designer in Austin, started her prep last fall, she skipped the setup step and spent her first two study sessions reorganizing files and re-downloading assets. That cost her an entire weekend. A 30-minute investment now prevents that kind of drift later.
Week 1: Interface, Project Setup, and Document Organization
Adobe's exam guide breaks the first two objective areas into project setup, interface configuration, and document management. These topics account for a significant chunk of the test, and they're the easiest domains to master once you've done the work deliberately rather than by muscle memory.
Days 1 to 2: Interface and Program Settings
- ☐ Customize the workspace from scratch. Reset to Essentials, then build a custom workspace with the panels you use most. Save it by name. The exam may ask about workspace management.
- ☐ Practice switching between Screen Modes (Standard, Full Screen with Menu Bar, Full Screen). Know the shortcut key (F).
- ☐ Configure Preferences. Walk through every tab in Edit > Preferences: Units & Rulers, Guides & Grid, Performance (RAM allocation, history states), File Handling, and Cursors. Take notes on what each controls.
- ☐ Set up color management basics. Assign an sRGB and an Adobe RGB working space. Understand Edit > Color Settings and why North America General Purpose 2 is a safe default.
- ☐ Use the Keyboard Shortcuts editor. Remap one shortcut you use frequently. Knowing where this dialog lives is an exam-relevant skill.
Days 3 to 4: Document Creation and Importing Assets
- ☐ Create documents at five different presets. Web, Mobile, Print (Letter), Film & Video, and Art & Illustration. Note how resolution and color mode change.
- ☐ Practice File > Place Embedded vs. Place Linked. Create a document with both types and observe the Layers panel difference.
- ☐ Import assets from Adobe Bridge. Drag and drop a raw file, a PSD, and an Illustrator file into a Photoshop canvas. Know how each behaves differently.
- ☐ Use the Libraries panel. Add a color swatch, a character style, and a graphic asset. Drag them into a new document.
- ☐ Practice Save, Save As, and Export. Export the same document as PNG-24, JPEG (quality 8 vs. 12), and PDF. Compare file sizes.
Days 5 to 6: Organizing Documents
- ☐ Rename, group, and color-code layers. Build a project with 15+ layers, organize them into named groups, and assign label colors.
- ☐ Use Layer Comps. Create three comps in a single document that show different layout states. Export each as a separate file.
- ☐ Practice Smart Objects. Convert a layer to a Smart Object, apply a filter, and confirm the filter remains editable.
- ☐ Work with Artboards. Create a three-artboard document (phone, tablet, desktop). Place different content on each, then export artboards individually.
- ☐ Use Guides, Grids, and Rulers. Set up a grid at 12-column layout spacing. Toggle Snap on and off and feel the difference.
Day 7: Week 1 Practice-Test Checkpoint
- ☐ Take a timed PlanetCert practice session focused on interface and document objectives. Target 30 to 40 questions.
- ☐ Review every missed question. Write down the topic area (e.g., "Smart Object conversion") and the correct answer's explanation.
- ☐ Log your score. Record it in a spreadsheet or notebook. You want to see Week 1's number climb by Week 4.
- ☐ Reschedule any unfinished Days 1-6 items into the Week 2 buffer slots.
When Marcus, a helpdesk tech transitioning into a design role, hit his first practice checkpoint, he scored 58 percent. The interface questions tripped him up because he'd never explored Preferences beyond General. That gap would have gone unnoticed without the checkpoint.
Week 2: Creating and Modifying Visual Assets
This is the heart of the exam. Objectives around selections, layers, adjustments, and compositing make up the largest percentage of test questions. Expect 30 to 40 percent of your exam to land here.
Days 8 to 9: Making Selections
- ☐ Practice every selection tool in a single session: Marquee, Lasso (standard, polygonal, magnetic), Quick Selection, Object Selection, and Magic Wand.
- ☐ Use Select and Mask. Cut out a person from a complex background. Refine the hair edge using Refine Edge Brush and Global Refinements sliders.
- ☐ Save and load selections. Create an alpha channel from a selection, then reload it later.
- ☐ Practice Select > Color Range. Select all blues in a landscape image and adjust only the sky.
Days 10 to 11: Working with Layers and Adjustments
- ☐ Apply five adjustment layers: Curves, Levels, Hue/Saturation, Color Balance, and Black & White. Each should be non-destructive with a clipping mask.
- ☐ Use blend modes deliberately. Apply Multiply, Screen, Overlay, and Soft Light to a texture layer over a photo. Note what each does to shadows, midtones, and highlights.
- ☐ Create a composite with at least six layers. Combine two photos, a shape, text, an adjustment layer, and a Smart Object filter. Group everything logically.
- ☐ Practice Layer Styles. Apply Drop Shadow, Bevel & Emboss, Stroke, and Gradient Overlay. Save a custom style to reuse.
Days 12 to 13: Filters, Retouching, and Correction
- ☐ Use the Healing Brush, Spot Healing Brush, Clone Stamp, and Patch Tool on a portrait with visible blemishes.
- ☐ Apply Camera Raw as a filter. Open a JPEG as a Camera Raw filter and adjust white balance, exposure, and clarity.
- ☐ Practice Content-Aware Fill. Remove an object from a photo using Edit > Content-Aware Fill and adjust the sampling area.
- ☐ Sharpen with Unsharp Mask and Smart Sharpen. Compare results and know when each is appropriate.
Day 14: Week 2 Practice-Test Checkpoint
- ☐ Take a full-length PlanetCert practice test. Aim for 50 or more questions covering all domains studied so far.
- ☐ Compare your score to Week 1. You should see measurable improvement, especially in selection and layer questions.
- ☐ Identify your weakest sub-topic. Spend 30 extra minutes on flashcards or re-reading the exam guide section for that area.
- ☐ Update your gap log. Keep a running list of topics where you missed questions. This log drives your Week 4 review.
This is a good time to weave in Adobe Photoshop practice questions that mirror the live-in-the-app format. Running targeted question sets after each study block helps lock in the muscle memory you're building in Photoshop itself.
Week 3: Typography, Output, and Design Correction
Week 3 covers the domains many candidates underprepare for — type handling, print and screen output, and design correction. These topics appear less glamorous than compositing, but the exam weights them meaningfully.
Days 15 to 16: Typography
- ☐ Create point type and paragraph type. Understand the difference and when each is appropriate.
- ☐ Work with Character and Paragraph panels. Adjust leading, tracking, kerning, baseline shift, and paragraph alignment.
- ☐ Apply type on a path. Draw a curved path with the Pen tool and flow text along it.
- ☐ Use Type > Convert to Shape and Rasterize Type. Know what you lose at each conversion step.
- ☐ Create text effects. Apply a clipping mask to text so a photo shows through letterforms.
Days 17 to 18: Preparing Output
- ☐ Export for web. Use File > Export > Export As and Save for Web (Legacy). Compare PNG-24, JPEG High, and GIF outputs.
- ☐ Prepare a print-ready file. Set up a document at 300 PPI, CMYK color mode, with 0.125-inch bleeds. Export as PDF/X-1a.
- ☐ Use the Print dialog. Configure scaling, color management, and marks and bleeds. Even if you don't print, the exam may ask about print settings.
- ☐ Package a file. Use File > Package to collect fonts and linked assets into a deliverable folder.
- ☐ Understand resolution independence. Explain why a Smart Object scales better than a rasterized layer at 200 percent.
Days 19 to 20: Design Correction and Evaluation
- ☐ Use Histogram panel to evaluate exposure. Open an underexposed image and diagnose the problem from the histogram shape.
- ☐ Correct color cast. Use Curves with the gray-point eyedropper and Levels to neutralize a color tint.
- ☐ Apply perspective crop. Straighten a building photo taken at an angle using the Perspective Crop tool.
- ☐ Use Edit > Transform > Warp and Puppet Warp to adjust the pose or shape of an element non-destructively.
Day 21: Week 3 Practice-Test Checkpoint
- ☐ Take a PlanetCert practice test that emphasizes typography, output, and correction questions.
- ☐ Drill flashcards on weak areas. Spend 20 minutes on your gap log items before the checkpoint so you can test whether the review stuck.
- ☐ Review the full exam guide one more time. Cross off every objective you feel confident about. Anything not crossed off gets extra time in Week 4.
- ☐ Update your score log. Track your progress across all three checkpoints.
Jenna, a print production specialist, thought her output skills were solid. Her Week 3 checkpoint revealed she was consistently missing questions about color management and PDF export settings. She spent an extra evening on those topics and caught up before the final review week. Without the checkpoint, she would have walked into the exam with a blind spot.
Week 4: Review, Timed Drills, and Readiness Audit
The final week is not about learning new material. It's about consolidating what you know, closing the gaps your checkpoints revealed, and building the stamina to perform under timed conditions.
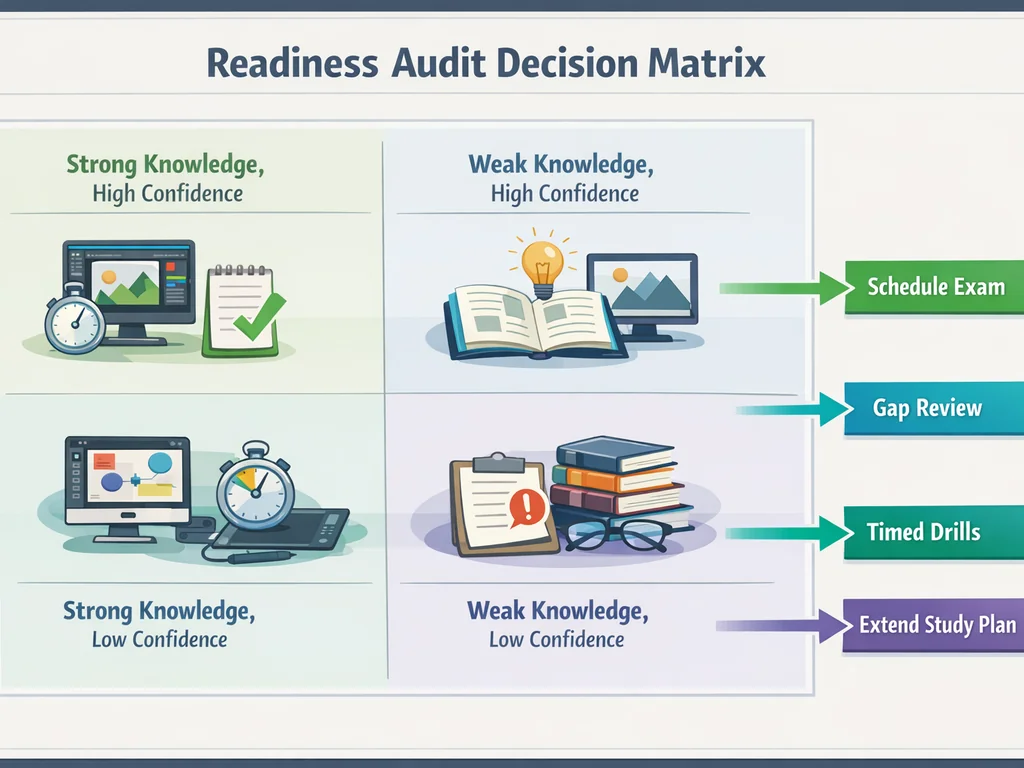
Days 22 to 23: Targeted Gap Review
- ☐ Pull out your gap log. Sort topics by frequency — the areas you missed most get priority.
- ☐ Re-study each weak topic using the exam guide, Adobe's official tutorials, and your own project files from Weeks 1-3.
- ☐ Rebuild one project from scratch that covers your weakest two domains. Time yourself.
- ☐ Use PlanetCert practice questions in focused mode. Filter to only the domain you're weakest in and run 20 questions.
Days 24 to 25: Full-Length Timed Drills
- ☐ Simulate exam conditions. Close all other apps, set a 50-minute timer, and take a full-length practice test in one sitting.
- ☐ Score the drill. Aim for 75 percent or higher. This is the threshold where most candidates pass comfortably.
- ☐ Take a second timed drill the next day. Consistency matters more than a single high score.
- ☐ Review wrong answers immediately. Don't just check the score — read every explanation for questions you missed or guessed on.
Days 26 to 27: Pre-Exam Readiness Audit
Run through this final audit honestly. If you can't check an item, you have 48 hours to fix it.
Knowledge checkpoints:
- ☐ I can name all exam domains and roughly what percentage each covers.
- ☐ I can explain every term on the official exam guide without looking at notes.
- ☐ I know the difference between destructive and non-destructive editing and can demonstrate both.
- ☐ I can set up color management for both screen and print output.
- ☐ I can create, edit, and output type in at least three different scenarios.
Practical checkpoints:
- ☐ I can complete a selection-and-mask workflow in under 5 minutes.
- ☐ I can build a multi-layer composite with Smart Objects, adjustments, and blend modes without referring to tutorials.
- ☐ I can export a document for web, print, and PDF delivery.
- ☐ I can navigate Photoshop's interface quickly using keyboard shortcuts for my 10 most-used tools.
Logistics checkpoints:
- ☐ My exam is scheduled, and I know the testing center location.
- ☐ I have two forms of ID ready.
- ☐ I've confirmed the Adobe Certified Professional exam requirements and know the format — selected-response questions followed by live-in-the-app tasks, all within 50 minutes.
- ☐ I've done a practice session in the exact 50-minute block I'll test in (morning, afternoon, or evening) to match my peak alertness.
Day 28: Rest and Light Review
- ☐ Skim flashcards one final time. No deep study — just reinforce what you know.
- ☐ Close Photoshop and do something else. Your brain consolidates skills during rest, not during cramming.
- ☐ Lay out everything you need for test day. IDs, confirmation email, directions to the center.
Keeping Your Study Plan on Track
Four weeks is tight but realistic for someone with intermediate Photoshop experience. The checkpoints after each week are what make this plan work — they surface weak spots while you still have time to fix them. Skipping a checkpoint is the most common reason candidates fall short.
If your checkpoints show you're consistently below 60 percent, consider extending to a five- or six-week schedule. The structure stays the same; you just add review time between Weeks 2 and 3.
Practice tests that mirror the live-in-the-app format are especially valuable for this certification. Browsing the Adobe exam catalog on PlanetCert can help you find the exact practice set that matches your target credential. Pair those practice sessions with the hands-on exercises above, and you'll walk into the testing center with both the knowledge and the muscle memory to perform under pressure.
Ready to test your readiness? Explore Adobe Photoshop practice tests and see where your current skills land against the real exam objectives.
Frequently Asked Questions
How long does it take to prepare for the Adobe Photoshop certification?
Most candidates with intermediate Photoshop experience need 4 to 6 weeks of focused study at 60 to 90 minutes per day. Adobe's official guidance references approximately 150 hours of combined experience and instruction. If you use Photoshop daily for work, you can compress preparation into the four-week plan outlined above.
What score do I need to pass the Adobe Certified Professional Photoshop exam?
Adobe does not publish a fixed passing score publicly, but most preparation resources and testing platforms target 70 to 75 percent as a safe benchmark. Focus on consistent performance across all exam domains rather than chasing a specific number.
Is the Adobe Photoshop certification exam hands-on?
Yes. The exam includes a selected-response questions section followed by live-in-the-app tasks inside Photoshop. Both sections must be completed within the 50-minute session. This is why hands-on practice matters as much as memorizing terminology.
Can I retake the Adobe Photoshop exam if I fail?
Yes, but Adobe enforces a waiting period between attempts. Review the retake policy on the How to get Adobe Certified page before scheduling, as the specific wait time may vary.
What's the difference between Adobe Certified Professional and Adobe Certified Expert?
Adobe Certified Professional is the entry-level credential that validates foundational Photoshop skills through a live-in-the-app exam. Adobe Certified Expert (ACE) is a higher-tier certification with deeper technical requirements. Most candidates start with the Professional credential before pursuing Expert status.
Further Reading

Discussion
Question Comments
0 comments·0 participantsSign in to leave a comment and access more free questions.